How to Make a Scrapbook Collage in Gimp
Working in a small biotechnology company, Leah enjoys gardening and raising chickens in Western New York.

Digital Scrapbooking With GIMP: How to Make a Digital Scrapbook
Capture Memories
Love the look of beautiful scrapbook pages, but hate the cutting, gluing, and mess? Use the GIMP photo editor program to create free digital scrapbook layouts: it will save money on scrapbook supplies, save time, and preserve wonderful memories in a gorgeous format.
Find Free Digital Elements
Before you begin creating your digital layout in GIMP, you will need to find free digital papers, embellishments, and frames. A few good sites for these items are:
- computerscrapbook.com: Registration is required, but the site features many full digital scrap-booking kits for no cost.
- freedigitalscrapbooking.com: This site offers many page elements and quick-pages for free.
Save your elements in file folders, labeled with the type of element. For example, in my computer there is a file for digital papers, digital frames, alphabets, titles, and more.
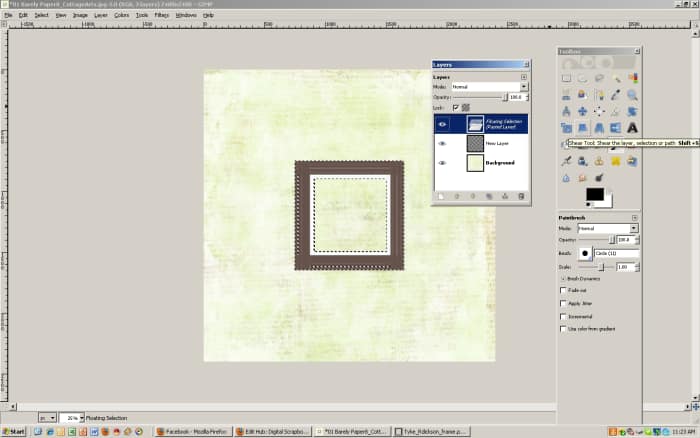
Add a frame using the "Layers" window
Create a Basic Layout
Select Your Background Paper
- Open the GIMP program. Go to the tab on the top of the page that says WINDOWS. Open this tab, then select DOCKABLE DIALOGS. From the dockable dialogs window, select LAYERS. A small window will appear on your main GIMP page to show all layers.
- Go to the tab on the top of the GIMP program that says FILE and select OPEN. Select the image file for your digital scrapbooking paper. The paper will be displayed on the GIMP screen.
- Next, go to the the LAYER WINDOW and click on the small white paper icon in the lower left corner. This will create a NEW LAYER. Alternately, you can go to the LAYER tab on the top of the screen and select "NEW LAYER." The default settings are fine, so simply select "OK" and a new layer will appear in the layer window.
Add in Frames, Photos, and Embellishments
- Go to the FILE tab and select OPEN. Choose a picture frame from your files. The picture frame will open in a new GIMP window.
- Click on the new window containing the photo frame, then go to EDIT and COPY the image of the frame.
Return to the original GIMP screen displaying the paper background.
- Click on the new layer in your layer window. From the EDIT tab, PASTE the frame image into the new layer. A new area will appear in the layer window stating "floating layer." Click ANCHOR LAYER (the anchor symbol on the layer window).
- The frame will now be displayed on top of the paper background. Move your frame to the desired location on the page by selecting the MOVE tool from the GIMP toolbox. Select "Move the active layer" at the bottom of the toggle. Simply click on the frame layer in the layer window, and move the frame to the desired location.
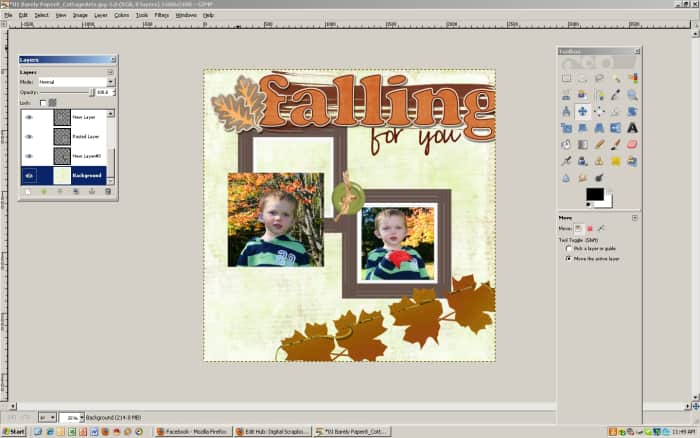
- To add a photo, click on the layer window and CREATE A NEW LAYER again. Go to FILE, select OPEN and select the photo you would like to add to the page. COPY the photo, go to the original screen and PASTE the photo into the new layer. Click ANCHOR LAYER and move the photo to the frame. You will have three layers at this point.
- The photo will not be "under" the frame at this point. To move the photo under the frame, select the photo layer in the layer window and click on the green "down" arrow to move the photo layer under the frame layer.
- In addition, the photo and the frame will probably not match in scale and size. Use the SCALE tool to re-size the photo and/or frame as necessary.***
*** Important Note: Sometimes scaling and moving a new layer is difficult once the layer is anchored down. If this becomes difficult, move and scale the new layer object prior to anchoring the layer down.
To add embellishments, titles, and photos, repeat the following process:
- Create a new layer
- Open a new image file of the item you want on your scrapbook page.
- Copy and paste the item into the new layer.
- Move and re-size the layer as needed.
- Anchor the layer.
Move and Resize Elements in GIMP
Save the Final Image
When the digital scrapbooking page is complete, save the file as a .jpg image. GIMP will state the image must be exported: click "OK" and select "100%" for the image quality. This process will "flatten" the digital scrapbook page, and when you look at the saved image, no layers will be present.
You can rotate, flip, and do many other creative changes to your digital scrapbooking elements. Add text with the text tool, and journal on the page to record dates and memories. By working with the color tab, you can alter the color of certain page elements, changing a red ribbon to blue, for example.
Print Your Scrapbook Pages
Find a good photo printing service and print your pages in a 12x12 or 8x8 format. A good site for this is scrapbooksplease.com. When your prints arrive, place them into a traditional scrapbook album (available at craft stores like JoAnne Fabrics or Michaels).
Video Tutorial: Digital Scrapbooking With GIMP
Common Problems
A few things may happen when working with layers. If you accidentally click on the wrong layer and move it, simply go to EDIT and click UNDO. Make sure you have selected the layer you want to work on before scaling or otherwise editing a specific element.
If you paste an object (like a photo or photo mat) into a new layer, this may completely cover up the layers underneath it. Don't panic! Simply resize the photo layer and you will see the background paper underneath.
Additionally, a layer may get "hidden" by other layers. If this happens, simply use the green up/down arrows on the layer window to move the element back into view.
© 2011 Leah Lefler
Leah Lefler (author) from Western New York on January 11, 2012:
Hi Mary,
Is the entire page blurry, or just the photos you are using? That is rather strange...
Here are some suggestions (though I haven't seen the images so I'm guessing at the problem):
1) use very high quality photo images (the low-res versions will look blurry when blown up in size).
2) use high resolution page graphics and backgrounds.
3)Make sure the winkflash book is set for a 12x12 or 8x8 page. Most scrapbook backgrounds and embellishments are set for those ratios - so an 8 x 10 or 8 x 11 book will distort the page.
4) when you save the image, make sure you are saving it at the full image quality (100%).
When you simply open the image to view it, is it clear? I'm asking because if it is only blurry in winkflash, the problem might be with that website rather than your scrapbook page itself...
Let me know what you find out! I generally upload mine to scrapbooks please so I haven't tried winkflash before!
mary foreman on January 10, 2012:
mine is slightly blurry when I save it and open it in winkflash to include it in my book - any suggestions?
Leah Lefler (author) from Western New York on September 03, 2011:
I'm glad you enjoyed it - I really like digital scrap booking because it saves both money and time (and with two small boys in the house, I'm always for anything that saves money and time!
htodd from United States on September 03, 2011:
This is really great hub..Thanks for the nice hub...
How to Make a Scrapbook Collage in Gimp
Source: https://feltmagnet.com/crafts/Digital-Scrapbooking-With-GIMP
Belum ada Komentar untuk "How to Make a Scrapbook Collage in Gimp"
Posting Komentar