Diy Big Surprise Explosion Photo Album Big Box Scrapbook
Simple Box Shelves
Custom-size and finish these super-simple box shelves for any room in the house
 Family Handyman
Organize the clutter. These simple box shelves will store books, hats, shoes, and all kinds of knick-knacks. You can even sit on them!
You might also like: TBD
- Time
- Complexity
- Cost
- A full day
- Beginner
- $51–100
Simple Box Shelves Step 1: Design your project and collect the tools materials

Super-strong construction
These box shelves are amazingly sturdy, thanks to the two-layer, 1/2-in. plywood design. The thickness and the overlapping joints make them strong enough to display or store anything. You can even park yourself on one if you need to!
We've designed these simple wooden box shelves for heavyweight storage and incredibly easy construction. Use them for hats and gloves, books, games and toys, or even laundry supplies. Custom-size them for whatever space you have available and for whatever it is that needs a home.
You'll be able to build one large box from a sheet of plywood and have a bit left over for another box. Any veneered 1/2-in. plywood will work, but we suggest birch because the grain doesn't show through paint. Buy a quart of woodworker's glue, and 3/4-in. and 1-in. brads for your nail gun. If you don't have a nailer, you can hand-nail, but it will be a bit of a struggle. You'll also need fast-drying wood filler. Buy a quart of B-I-N or KILZ primer and a quart of latex enamel paint in the color of your choice. If you choose a gloss finish, be aware that if you don't pay attention to filling and sanding, every single imperfection will proudly display itself. Also pick up some mini rollers (Photo 6) for applying the finishes. And finally, a flush-trim router bit will speed up the final trimming (Photo 4). That way you can cut the outer panels a little long and achieve perfectly flush ends without the hassle of precise cutting.
Figure A: Simple Box
Size the box to fit the wall space and objects you intent to put on it. See Step 2 for tips on determining exact dimensions of the parts.
Simple Box Shelves Step 2: Cut out the parts

Photo 1: Cut out the parts
Cut the box parts to length. A simple homemade crosscutting jig lets you make perfect cuts with a circular saw.
It's easiest to rip the parts on a table saw, but you can use a circular saw and a ripping guide. If that's your plan, use a crosscutting guide (Photo 1) when you cut the lengths. Use fine-tooth crosscutting blades for both types of saws. After deciding on the size of your box, you'll need to rip two different widths for the box panels. Rip the four inner panels 1/2 in. narrower than the final box depths, and rip the four outer panels to match the final depth. Be sure to rip enough material to get all of the parts made. If you like adjustable shelves, drill the peg holes before assembly. Measure the inner box after assembly to get the dimensions for the back panel. Cut the back 1/8 in. overlong in both directions and rout off the excess as we show in Photo 4.
Simple Box Shelves Step 3: Assemble the box and trim the edges

Photo 2: Glue and nail the inner box
Glue and nail the box together, using a framing square to hold it square. Make the back 1/8 in. larger than the box, then glue and nail it in place and rout any overhangs (Photo 4).
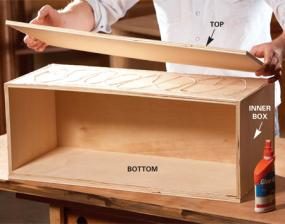
Photo 3: Glue and nail the outer box
Add a second layer of plywood to the top and bottom of the box.

Photo 3A: Oversize each panel
To avoid fussy measuring and cutting, oversize each panel by 1/8 in. and cut off the excess later.

Photo 4: Trim the edges flush
Trim the overhanging plywood with a flush-trim router bit. The bit leaves a straight, smooth cut that's perfectly flush at the ends. Install the end panels using the same method.
Assemble the outer box with glue and nails. As you glue and nail on the back, bend out any bows in the sides (Photo 2).
Cut the top and bottom outer panels to length, 1/8 in. longer than the box. Apply a bead of glue about 1/4 in. in from the edges and a second bead in a zigzag pattern in the middle (Photo 3). Align the panels flush with the front and with equal overhangs at the ends.
Nail the parts together with 3/4-in. nails. Be careful. It's tough to fix the damage from nails that miss the mark. If you have clamps, use them to squeeze closed any gaps. A tight joint will reduce the amount of sanding and filling you have to do later. For a perfect edge, shave the overhangs with a flush-trim router bit (Photo 4). As before, cut the side panels 1/8 in. longer than the box sides, and then apply and trim them as you did with the top and the bottom.
Simple Box Shelves Step 4: Finish the box

Photo 5: Fill gaps and holes
Fill the plywood edges as well as nail holes and dents. Use a fast-drying filler so you can sand the patches right away.

Photo 6: Prime and paint
Prime the box, brushing the inside corners first. For a fast, smooth finish on the rest of the box, use a small roller. Then sand the primer, and paint using the same method.
Sand the exposed plywood edges until they're smooth, first with 80-grit paper and then 120-grit. Then work wood filler into all of the edge grain, nail holes and dents (Photo 5). After the filler sets, sand everything flat with 120-grit paper.
Brush primer into the inside corners and then roll primer onto the rest of the box (Photo 6). After it dries, voids that didn't get filled will be very apparent. So fill anything you missed, and then sand and prime those spots again. Brush and roll on two coats of paint, lightly sanding between the coats with 220-grit paper.
Simple Box Shelves Step 5: Mount the box on the wall

Photo 7: Locate wall studs
Outline the box location on the wall and mark the wall studs. Use the outline to mark the pilot holes and then drill them through the back of the box.

Photo 8: Fasten with screws
Align the box with the outline and screw it to the wall studs with 3-in. deck screws.
It's imperative that you screw these boxes to at least two wall studs; no wall anchors of any kind will pass muster. Use at least two 3-in. deck screws near the top and two more at the bottom into separate studs. If more studs are available, use those, too. In Photos 7 and 8, we show you an easy way to position and drill pilot holes so the screws will hit the studs when you mount the boxes.
Vertical box with adjustable shelf
Add an adjustable shelf by drilling peg holes, evenly spaced in the inner box sides. Drill before assembling the box.
Required Tools for this simple box shelves project
Have the necessary tools for this DIY project lined up before you start—you'll save time and frustration.
Table saw (optional), Paint roller, small diameter, You'll also need ripping and crosscutting guides for your circular saw and a flush-trim router bit.
Required Materials for this simple box shelves project
Avoid last-minute shopping trips by having all your materials ready ahead of time. Here's a list.
Additional Information
Similar Projects
Diy Big Surprise Explosion Photo Album Big Box Scrapbook
Source: https://www.familyhandyman.com/project/simple-box-shelves/
Belum ada Komentar untuk "Diy Big Surprise Explosion Photo Album Big Box Scrapbook"
Posting Komentar